How to Record a Zoom Meeting on PC/Phone [Ultimate Tutorial]

How to Join a Zoom Meeting: Ultimate Tutorial for Beginners [2023]
June 22, 2023
How to Record a Google Meet [Ultimate Tutorial 2023]
June 25, 2023Zoom meetings are an excellent way to connect with team members or colleagues. But what if you need to record the critical information during the call for later reference? Or what if you want to share the session details with team members who couldn’t attend? That’s where Zoom’s in-built recording feature comes in to solve the problem of how to record a Zoom meeting.
Zoom allows you to record sessions on both PC and mobile devices with a few restrictions. For instance, only the meeting host and the participants (with recording access) can record the conference. But what about the participants with no recording access or the times when there is any technical fault and you cannot use the in-built feature of Zoom? In short, third-party software can help!
In this guide, CJ Digitals will reveal everything related to recording Zoom meetings. In addition, we will shed light on third-party software that lets you record and transcribe Zoom sessions in real time.
How to Record a Zoom Meeting on PC?
Zoom allows the meeting host to utilize the in-built recorder to record Zoom meetings. The best part about the recording feature is that it is accessible to both free and paid users. Follow the simple steps to start recording Zoom meetings on your laptop or PC as a host.
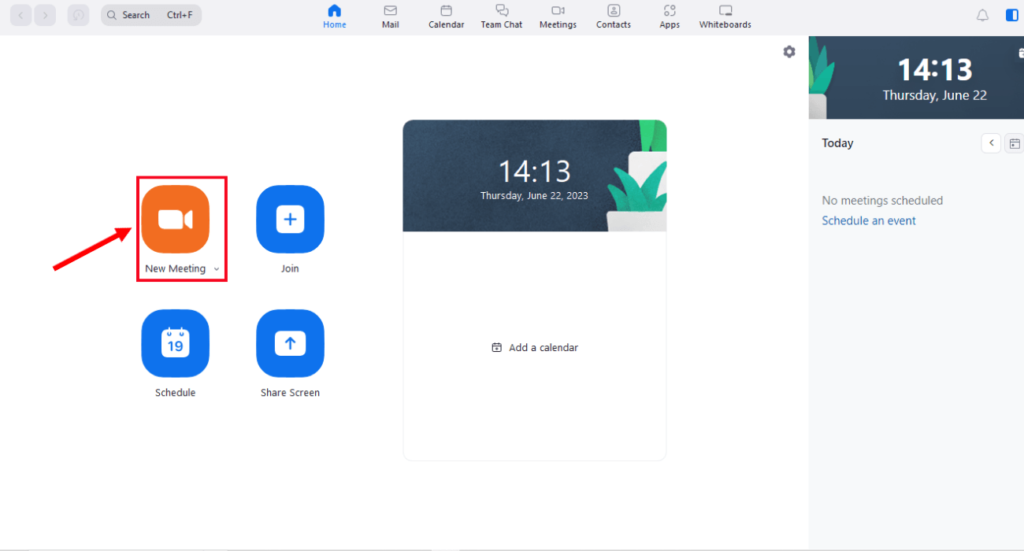
Step 1: First, go to the Zoom desktop client or web portal and start hosting a new meeting.

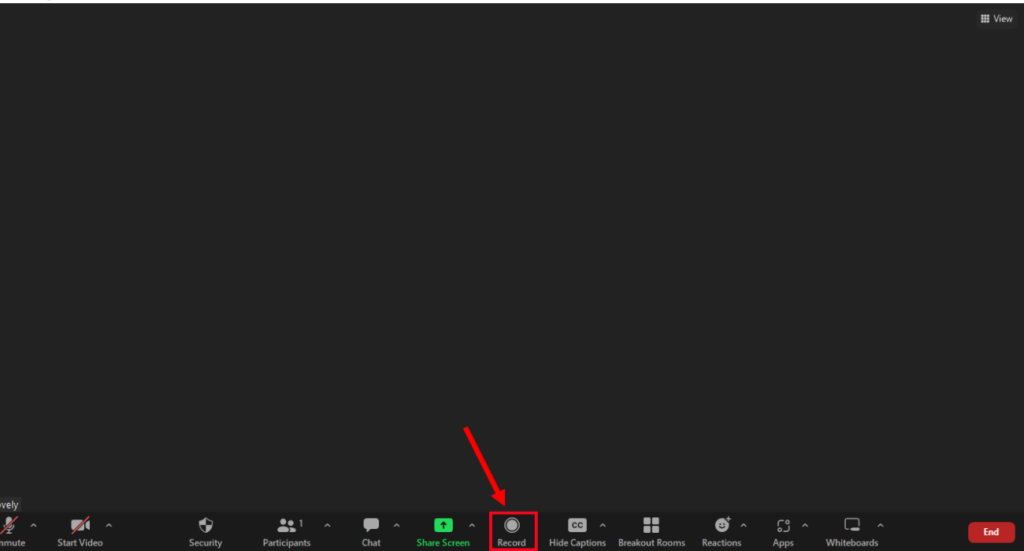
Step 2: In the below toolbar, locate the ‘Record’ option to start recording.

Note: If you are a free Zoom user, the meeting recording will be automatically saved to your local folder. Alternatively, if you have a paid Zoom subscription, you can save the recording to the computer or directly to the cloud.
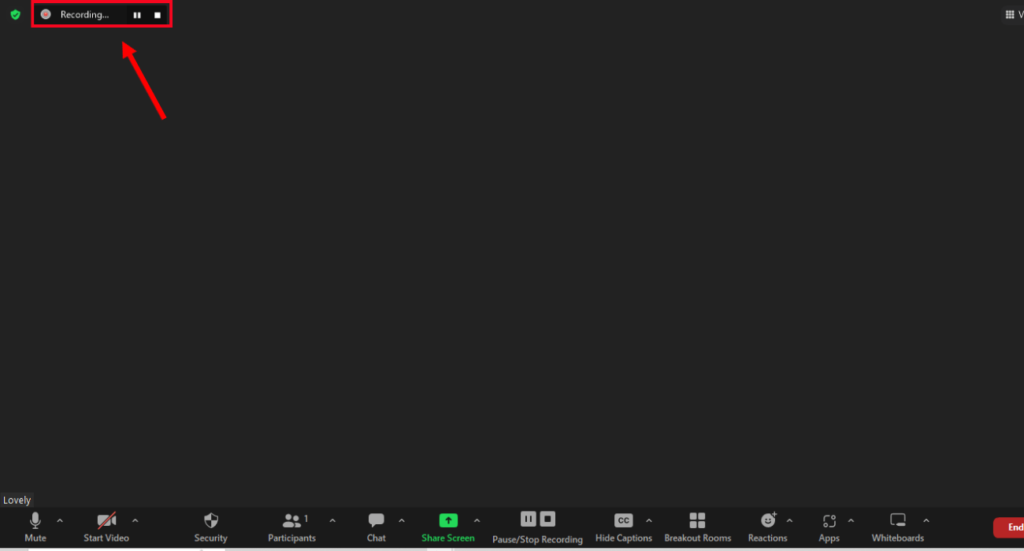
Step 3: The recording will immediately start, and a recording indicator will be visible at the top.

Once the recording ends, Zoom will automatically save it for quick accessibility at a later stage. While local recordings are available on your local hard drive, cloud recordings are available in an online folder in the cloud. To further improve your experience, consider integrating the best Zoom apps to enhance the collaboration capabilities of the video conferencing tool.
How to Record a Zoom Meeting on the Phone?
Unlike PC or laptops, the Zoom recording feature is only accessible to individuals with paid subscriptions. Additionally, the recorded files will only be saved in the cloud as cloud recordings.
Here are the simple steps to follow to easily record Zoom sessions on your Android or iPhone devices.
Step 1: Open the Zoom meeting. At the bottom right corner of the screen, tap on the ‘More (…)’ option.
Step 2: Select the ‘Record’ option on your Android device. If you are an iPhone user, select ‘Record to the Cloud.’ You will now see a recording prompt at the top.
Step 3: Once the meeting ends or you manually stop the recording, it will automatically be saved to the cloud.
You can access the recorded sessions anytime under cloud recordings or share them with your team members.
How to Record a Zoom Meeting as a Participant?
In order to let a participant record Zoom meetings, the host will have to provide them with recording access. Here are the steps the host has to follow to assign recording privileges to the participant:
Step 1: Open the Zoom meeting and select ‘Participants.’
Step 2: In the participants’ menu, hover over the name of the participant to whom you want to grant recording access. Select the ‘More’ option next to their name.
Step 3: Click ‘Allow Record,’ and the participant will receive the recording privileges. Whenever a participant starts recording, an icon will be displayed next to their name.
The host can restrict recording access anytime they want with a simple click.
How to Record a Zoom Meeting Without Permission?
Sometimes it can be challenging to ask for permission from the host, or there might be an issue in providing access. This often leads to missed details and unrecorded sessions. That is why it’s vital to have a backup plan ready. At CJ Digitals, we understand the importance of having a backup. As one of the leading content writing and content editing agencies, we frequently schedule Zoom meetings with team members and clients.
Having third-party software like Notta Chrome Extension streamlines the process of recording all the critical information during the Zoom calls, so we don’t have to stress about permissions. However, one important thing to note is that you must let others know that they are being filmed. Before the Zoom meeting, we ensure that everyone is informed about the recording.
How to Record Audio During Zoom Meetings?
Many times we need audio instead of both audio and video. At CJ Digitals, when we schedule meetings that are focused on discussions and brainstorming, we record Zoom meetings with audio only. This ensures the team members can focus on the content of the session without worrying about visual presentation.
With so many third-party software available to record Zoom meetings with audio only, it can be daunting to choose the one that is feature-rich. But you don’t have to worry! The team of CJ Digitals has scrolled the Internet, tested multiple software, and chosen one of the best among them — Notta recording and transcribing tool.
The feature-rich tool offers two simple ways to record Zoom meeting videos — Notta Bot and Notta Extension. While Notta Bot is exclusively available for premium members, the Notta Extension can be used by both free and paid users.
If you want to use Notta Bot to record and transcribe the Zoom meetings, you can check our ‘How to Join a Zoom Meeting’ tutorial, where we reveal a step-by-step guide to using the robot.
Besides Notta Bot, Notta Extension is another effective and efficient tool that helps us record and transcribe any tab into text and edit it later. If you want to use Notta Chrome Extension, you can follow the below steps:
Step 1: Open Chrome Web Store and then search ‘Notta.’ Click on the Notta Chrome Extension.
Step 2: Select ‘Add to Chrome’ located next to Notta, and then ‘Add Extension.’
Step 3: Click the extension icon in the Chrome toolbar, and a drop-down menu will appear. Here you will find ‘Notta.’ Select the pushpin icon to add Notta to your Google Chrome toolbar.
Step 4: Create your free Notta account. All your Zoom recordings and transcripts will be saved to ‘Recent Records’ automatically on the Notta dashboard.
Step 5: Go to the Zoom session tab you want to transcribe. You can select the transcription language and click the ‘Start recording’ button to begin. Notta will start recording the meeting in the side panel.
Step 6: If you want to stop transcribing, click the red button. The transcript will be available on the Notta dashboard soon after the meeting ends.
Step 7: Go to the Notta dashboard and check ‘Recent Recordings.’ Here you will check the real-time recording and transcript. Click to edit, share, or export the transcription in multiple formats.
That’s it! With these few simple steps, you can use record Zoom sessions and generate AI summaries. Remember, Zoom offers multiple features, like breakout rooms, annotations, etc., to make sessions collaborative and interactive. Using third-party tools like Notta can help you maximize efficiency and productivity during Zoom meetings.
How Notta Helped CJ Digitals Streamline Zoom Recordings?
Zoom meetings have taken the world by storm, with every organization using the tool to connect with remote workers. At CJ Digitals, we use the Notta recording and transcribing tool to streamline our Zoom meetings and save critical points. Here are a few scenarios when we use the Notta recording tool:
Efficient Knowledge Retention
Whenever our team attends client meetings for complex campaigns, we ensure we record and transcribe them using Notta. Recording ensures that the team has detailed discussions, strategic insights, and client requirements handy and retained when needed. Additionally, the transcribing feature of Notta lets the teams convert the recorded video into text format, highlight key points, and ensure every piece of information is readily available.
Facilitate Effective Collaboration
Collaboration lies at the core of our work culture at CJ Digitals. Whenever we work on a project that requires effective collaboration, like a website copywriting project, we use the Notta recording tool. Designers can share design concepts during Zoom meetings and receive feedback from copywriters and the rest of the team. This approach helps us enhance teamwork and foster cohesive strategies.
Training and Continuous Learning
As one of the renowned content writing agencies, we highly prioritize team growth and development. The Notta recording tool greatly supports our training and continuous learning initiatives. During training sessions, we record the sessions so teams can have access to on-demand resources for self-paced learning or revision.
Enhance Client Communication
For CJ Digitals, effective client communication with clients is of paramount importance. Using a recording tool strengthens client interactions and ensures all requirements are met.
Overall, using a recording tool during Zoom meetings help us maximize productivity, foster a culture of excellence, and improve project outcomes. If you want to try the real-time recording and transcribing tool – Notta, create your free account today.
Conclusion
Zoom offers a built-in screen recording feature, but in order to use it, you have to be the meeting host or a participant with permission rights. Feature-rich third-party tools like Notta take things up a notch, all thanks to its transcribing capabilities.
If you want to explore the features of Notta the way we do, it’s time to create your free account. Not only will the tool help you record Zoom meetings, but it also lets you save valuable information in the form of transcripts for later review.


![How to Record a Zoom Meeting on PC/Phone [Ultimate Tutorial]](https://cjdigitals.com/wp-content/themes/betheme/images/cookies.png)