How to Record a Google Meet [Ultimate Tutorial 2023]

How to Record a Zoom Meeting on PC/Phone [Ultimate Tutorial]
June 23, 2023Do you find yourself taking notes during a Google Meet session and wishing you could just record the conversation for a later review? If so, you are not alone! Recording Google Meet sessions is a great way to save valuable insights from the meetings and ensure every team member can review it later at their own pace.
However, finding the elusive recording option during Google Meet sessions can be painstaking. This is because Google does not allow everyone to record the meetings. Only the premium account holders can leverage the benefits of the in-built screen recording feature during Google Meet.
At CJ Digitals, it was hard for the team members with no Google Workspace account to record the meetings. That’s why we scoured the Internet and found third-party apps that let us record the sessions without having to switch to a paid plan.
In this comprehensive guide, we will reveal how to record a Google Meet on a PC or on a mobile device. Additionally, we will discuss how third-party tools can help you streamline the process of recording and transcribing meetings.
Who Can Record a Google Meet?
Google does not allow everyone (host and participants) to record meetings. You can record the Google Meet only if:
- You are the meeting host having a Google Workspace account.
- You are from the organization of the host, and Host Management is off.
- You are not a member of the host’s organization but have been promoted to co-host.
- You are a teacher or co-teacher for the Google meetings specifically created through Google Classrooms.
Additionally, you must sign up for a Google Workspace Individual Plan to record Google Meet calls. The supported Google Workspace editions to get recording features include:
- Business Standard and Business Plus
- Enterprise
- Teaching and Learning Upgrade
- Education Plus
- Essentials
- Enterprise Essentials
- Enterprise Essentials Plus
Basically, if you are on a free Google account plan (i.e., you have a free Gmail account with no Google Workspace), you won’t be able to record Google Meet calls.
How to Enable Recording on Google Meet?
If you are using an eligible Google Workspace edition, follow the below steps to turn recording on or off for your organization.
Step 1: First, you need to sign in to your Google Admin console using an administrator account.
Step 2: In the admin console, go to Menu > Apps > Google Workspace > Google Meet.
Step 3: Select the ‘Meet Video Settings’ option.
Step 4: If you want to apply settings to everyone, select the top organizational unit. Alternatively, click a child organizational unit or a configurable group.
Step 5: Next, select the ‘Recording’ option. If you want other participants to record the meeting, check the box indicating ‘Let people record their meetings.’
Step 6: Click ‘Save’ to save the recording settings and use it in your next session.
Please note that you can use the recording feature through the Google Meet app on your PC. However, recording is currently unavailable on mobile devices.
How to Record a Google Meet on PC?
Once you have enabled the Google Meet recording option in your settings, follow the steps mentioned below to record the session on your computer.
Step 1: Start an ‘Instant Google Meet.’
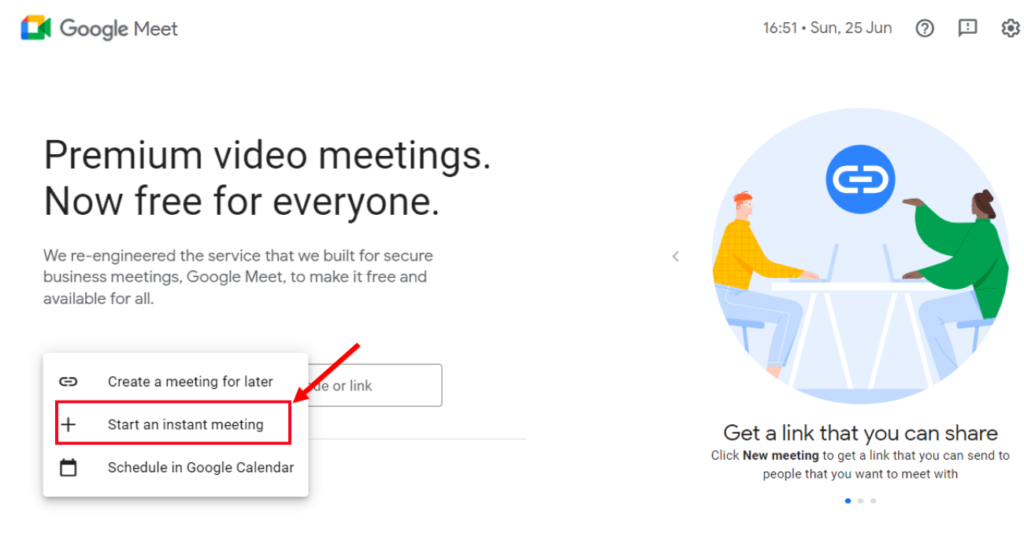
Step 2: In the window’s bottom right corner of the Google Meet toolbar, you can find the ‘Activities’ icon.
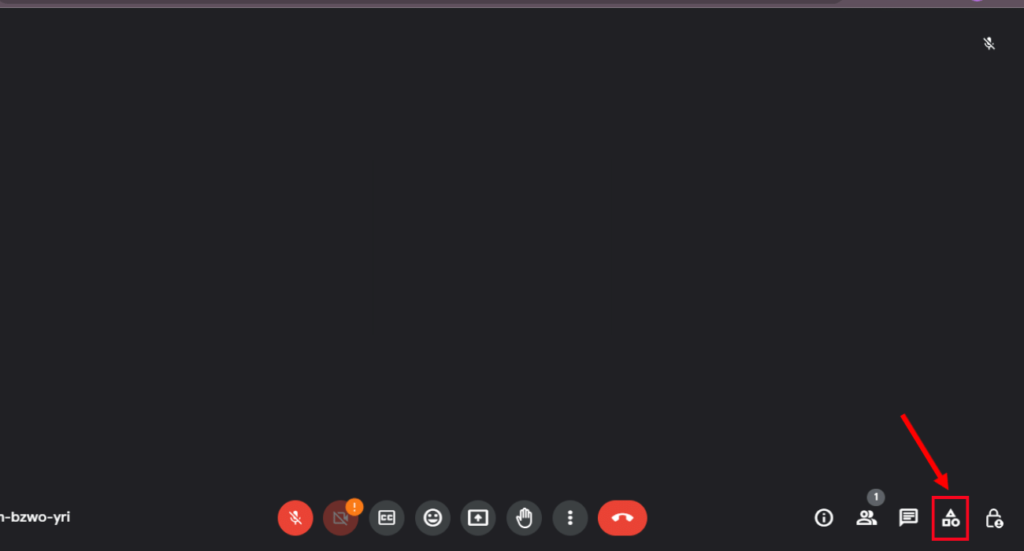
Step 3: Select Activities, and a side panel will open. Click the ‘Recording’ in the section.
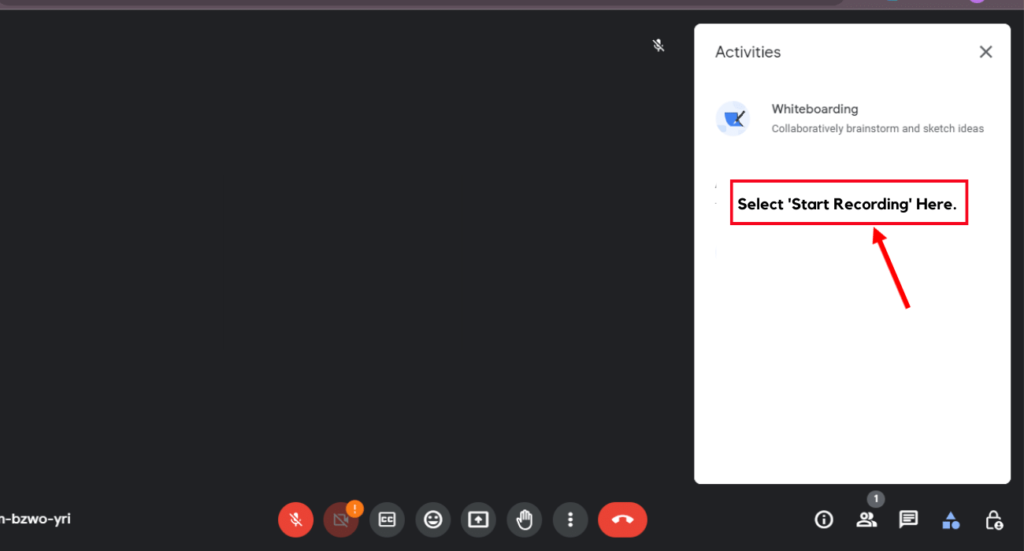
Step 4: Click ‘Start Recording,’ and all the participants will be notified that the Google Meet session is being recorded.
Step 5: If you want to stop Google Meet recording, go back to the ‘Recording’ session and select ‘Stop Recording.’ On the other hand, the recording will automatically stop once the session ends.
The recorded sessions will be stored in a new folder named ‘Meet Recordings’ in your Google Drive account.
How to Record & Transcribe Google Meet Calls Using Notta?
Notta is one of the feature-rich speech-to-text applications that allows you to record the audio from Google Meet sessions even if you don’t have a premium account. The tool can quickly transcribe meetings and translate them into 104 different languages. If you want to record audio from a Google Meet session, consider using the Notta Bot.
You can follow the below steps to use the Notta Bot feature and live transcribe Google Meet calls:
Step 1: Log in to your Notta account and head to the dashboard. On the right sidebar, select the ‘Join Live Meeting’ option, and a pop-up window will appear.
Step 2: Enter the Google Meet URL in the specified box, rename your Notta Bot, and click ‘Transcribe Now.’
Step 3: Notta Bot will enter Google Meet. Click ‘Admit.’
Step 4: The Notta Bot will automatically start recording and transcribing the meeting. You can leave the meeting or end the session for all to stop recording.
Step 5: To access the recorded session, go back to your Notta dashboard. Under ‘Recent Recordings,’ you can find your recorded Google Meet session. Simply click on it to see the complete transcription. With a few simple taps, you can share, download, or export recordings in multiple formats.
Why Does CJ Digitals Use Notta for Recording Google Meet Calls?
CJ Digitals is a leading content writing agency that offers top-notch written content to its clients. We understand the importance of effective collaboration and communication within our team to deliver top-notch and exceptional results.
In instances when the in-built recording feature of Google Meet falls short, we prefer using the remarkable recording and transcribing tool, Notta, to streamline our Google Meet sessions. Let us explore five critical ways in which CJ Digitals leverages the power of Notta to record and transcribe our Google Meet sessions.
Effortless Meeting Documentation: With Notta, we effortlessly document our Google Meet sessions for team members or clients. We use Notta to record and transcribe our Google Meet sessions. This way, everyone on our team can easily access the recordings and transcripts, so we’re all on the same page. This ensures that no critical details or discussions are missed, and the team has a reliable source to refer back to whenever needed.
Accurate Transcriptions for Seamless Collaboration: Notta’s powerful transcription capabilities enable CJ Digitals to obtain precise and detailed written records of their Google Meet sessions. These transcriptions can be easily shared among team members, facilitating seamless collaboration and eliminating the need for manual note-taking during meetings.
Enhanced Focus and Engagement: Knowing that Notta is efficiently capturing the meeting discussions, the team members can fully immerse themselves in the conversation without the constant pressure of taking comprehensive notes. This allows for increased focus, active participation, and improved engagement during the Google Meet sessions.
Saves Time: Notta’s transcription feature enables us to save valuable time during content creation. Instead of spending hours listening to recorded Google Meet sessions, the team members can quickly scan through the AI-generated transcripts, highlight key points of the meeting, and extract relevant information. Hence, this streamlined workflow allows the team to be more efficient and meet deadlines more effectively.
Easy Reference: By utilizing Notta to transcribe Google Meet sessions, the team members can easily search and reference specific discussions or decisions made during previous Google Meet sessions, ensuring consistency and accuracy in content development. This feature also facilitates knowledge sharing among team members, empowering them with access to valuable insights and information.
Overall, Notta acts as our reliable recording and transcribing tool for Google Meet and Zoom sessions, helping the team of CJ Digitals to enhance collaboration, save time, and improve the overall efficiency of our content writing process. If you are looking to explore the features of Notta, consider creating a free account on the recording and transcribing tool today.
FAQs
Why Can’t I Record on Google Meet?
There are several reasons why you might not be able to record your Google Meet sessions. Here are a few common reasons:
- The meeting host has disabled the recording settings.
- You don’t have permission to record the call as a participant.
- Some mobile devices, tablets, and specific browsers do not support the recording feature. Make sure your device is compatible with the feature.
- Incorrect settings on your device may restrict you from recording the Google Meet. Double-check that your camera, microphone, and other settings are configured correctly.
How to Record a Google Meet on Mobile Devices?
Google does not allow the meeting host or participants to record the sessions on mobile devices, such as Android or iOS. One of the best ways to record a Google Meet on a mobile device is using free screen recorder apps. You can download any screen recorder app like Screen Recorder – XRecorder app to efficiently save and record Google Meet sessions on your device.
Why does my screen recording have no sound in Google Meet?
According to Google, the only supported way to record a Meet and audio is by using the recorded feature available in the premium Google Meet editions. That means Google does not support third-party screen recording.
However, there are multiple third-party apps you can use to streamline the recording with audio. For instance, consider using Notta for audio recording and transcription, Screen Recorder – XRecorder to record on mobile devices, and VMaker for video and audio recordings.
How can I share the Google Meet recordings?
Google allows users to share their recorded sessions in multiple ways. Below are a few easy and quick ways to share a Google Meet recording session:
- Share Link: Once the Google Meet recording ends, it is saved to Google Drive, and a link will be sent to all the meeting participants through email. If you want to share the link with the participants, check the email notification you received.
- Share File: As the meeting is recorded in Google Drive, you can share the entire file by giving them access to the file. Right-click on the recorded file and select ‘Share’ from the menu to let others access the file.
- Google Classroom: Teachers can share the link with their students using Google Classroom. All you need to do is post the recording link to Google Classroom, where students can access and watch the recording anytime.
- Collaboration in Google Drive: Google lets you add collaborators to the Google Drive folder where the recording is saved. The collaboration feature allows users to access and edit the file, depending on the given permissions.
Key Takeaways
Recording Google Meet sessions help the participants to save valuable information for later access. If you use the Google Meet edition that supports the in-built recording feature, you can follow the steps mentioned in our ‘How to record a Google Meet’ article to enable the option in settings and start recording. However, if you are a free plan user, consider using the recording and transcribing tool — Notta. It is an excellent tool that not only allows you to record the sessions but also generates transcripts using ChatGPT.


![How to Record a Google Meet [Ultimate Tutorial 2023]](https://cjdigitals.com/wp-content/themes/betheme/images/cookies.png)